In part one of the lightning series, I introduced PageSpeed Insights (PSI) to measure your WordPress site’s performance and worked through two image optimization examples. In this next installment, you will learn how to use the browser developer tools to evaluate and optimize your server performance. Let’s get started.
Measure your server performance
We want to know how fast your WordPress server can deliver your home page HTML. The HTML for your home page contains references to additional components like CSS pages, images, fonts, JavaScript, and other assets that need to be downloaded separately. The faster your server provides the HTML document, the quicker your browser can get busy downloading these additional assets.
Most modern browsers offer developer tools you can use to measure how quickly your WordPress server dishes up your home page HTML. Here’s how:
- Load your WordPress site in Chrome
- With your browser open, press F12 on Windows or Fn+F12 on a Mac to activate the developer tools.
- You see a panel open up docked to your browser or possibly in a separate window.
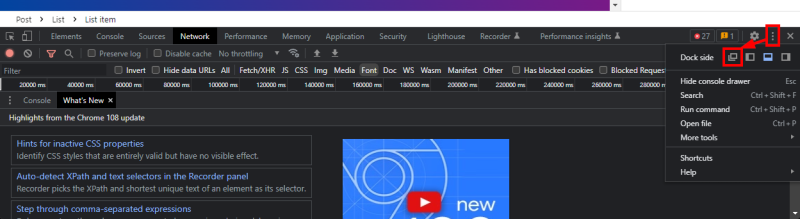
- I recommend you undock dev tools from your browser so you can view them in a separate window. Click the three dots in the upper right corner and then click the undock button.
- The screenshot below shows FireflyWP.com loaded up in a window with the developer tools next to it.
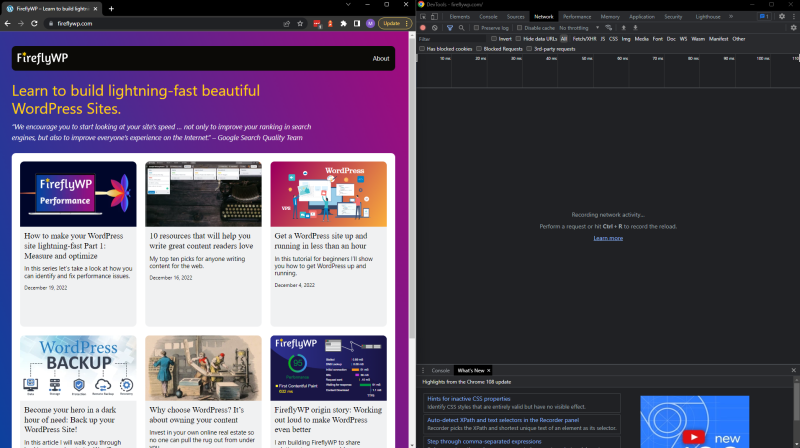
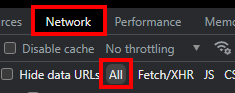
- Click the “Network” tab and make sure “All” is selected.
- Let’s reload the site, ignoring what’s in the cache: On Windows, use CTRL + F5 or Cmd + Shift + R on the Mac.
Find your home page load time in the waterfall
You should now see something like the screenshot below. The timeline at the top is helpful, but we will focus on the “Waterfall” section.

The chronological waterfall above shows an example of the browser-downloaded assets that make up your home page. The first item in the cascade is your home page HTML (highlighted in red). Notice that nothing else starts to download until the homepage HTML is downloaded. This is why it is essential to serve this as quickly as possible.
In my case, the FireflyWP.com home page HTML document is 11.5 kilobytes in size and took 267 milliseconds (ms) to download. That’s pretty good, but I would like to do better.
Use CTRL + F5 on Windows or Cmd + Shift + R on the Mac to reload the site a few times and write down the average load time of your home page. I refreshed again and recorded 226 ms, which I will use as my baseline.
Where is all that time spent?
Where is that 226 ms being spent? The dev tools will give you part of the answer if you hover your cursor over the request.
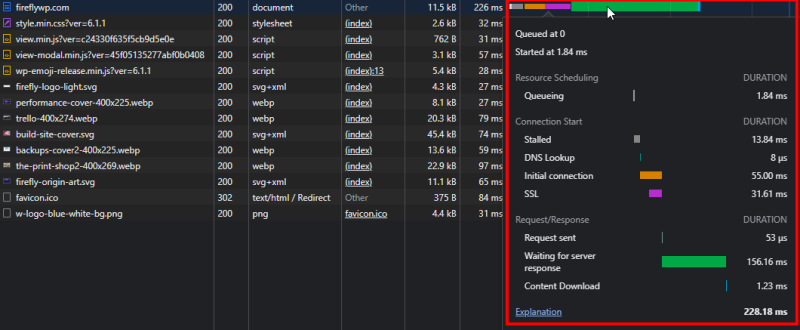
We lost over 80 ms on the initial connection and SSL setup, but most of it was lost on waiting for the server to respond. Downloading the 11.5kB of HTML took only 1.23 ms. Let’s focus on that time lost waiting for the server to respond.
In a typical WordPress setup, you have the following main components:
- Web server (I.e., Apache, NGINX, or Caddy)
- PHP processor
- WordPress PHP files
- MySQL database

Your web server is the service listening for incoming requests from the browser. Your browser might request static or dynamic content from your web server. What’s the difference?
Static content is usually files that can be served up without additional processing. Examples include HTML pages, images, text files, and CSS files. Serving static assets should be very fast because no further processing is needed.
Dynamic content requires additional processing before the web server can return it. Requesting a WordPress homepage with a list of recent blog posts is an example of a dynamic request. This is because WordPress first loads a page template, then queries the database for the list of posts, and finally inserts them into the template before returning the response. All this extra work requires more processor time.
Server response time for static files
If your webserver can’t serve static content quickly, it certainly won’t be able to serve dynamic WordPress pages very fast. Let’s see where we stand.
Most WordPress installations will have an HTML file named “readme.html.” We can request this file and monitor the results in developer tools. With dev tools open, I’ll point my browser at https://fireflywp.com/readme.html. If you get a 404 error, try “license.txt.” If that doesn’t work, examine the 404 response itself.

In my case, the request took only 26 ms to complete. That is very fast. Most of that time is network latency between my house and the DigitalOcean NYC1 data center. Try this test with your own host. Assuming you are on the same continent as your hosting service and have a good internet connection, your response should be under 100 ms. If it is over 100 ms your server might be too overloaded or poorly connected. Also, make sure your own internet connection is good and has low latency. Speedtest.net can help you with that.
In my FireflyWP.com example, 26 ms of the 226 ms it took to serve the home page HTML is network latency and the web server response time. That leaves 200 ms.
WordPress dynamic content
Here’s how the remaining 200 ms in my example is spent:
- The web server calls the PHP processor to run the WordPress index.php file.
- The index.php file includes other PHP files that initialize WordPress’s 200+ PHP files. That’s a lot of PHP code!
- Installed plugins are initialized.
- Queries are made to the MySQL DB for the page content
- The page template is populated with the content and returned
We could spend a lot of time measuring each event to figure out precisely where that 200 ms is being spent but what if we could cheat? What if we could make WordPress dynamic content behave like static files? This is where page caching comes in.
WordPress page caching
If you use WordPress as a blog, marketing page, or company home page, your content is probably not changing too often and looks the same for every user. A caching plugin can save a copy of the fully rendered page in memory, so it’s ready for the next request. This allows us to skip the series of events above for subsequent page requests.
There are many page caching plugins to choose from, including WP Rocket and W3 Total Cache, but I will use WP Super Cache because it is from Automattic, the WordPress.com folks. Follow these steps to install it:
- Click the “Plugins” menu option on the WordPress admin console.
- Click “Add New” at the top of the plugins page.
- Search for “WP Super Cache.”
- Click “Install” and “Activate” on WP Super Cache.
- Click the “Settings” menu options from the WordPress console.
- Click “Caching On” and then “Update Status.”
- Click “Test Cache” to make sure it is working.
Load up your WordPress home page in your browser. On Windows, use CTRL + F5 or Cmd + Shift + R on the Mac with the dev tools open to check your home page load time. The load time for FireflyWP.com dropped to 31 ms! I’ll take it!
What if page caching won’t work for me?
If page caching is not an option because you are doing e-commerce with a shopping cart or your content varies based on the user logged in, you will need to do more digging. Here are some quick tips:
- Use the excellent “Query Monitor” plugin by John Blackbourn to analyze your database performance.
- If you use a page builder theme, try briefly switching to one of the WordPress default themes to see if your page response time improves. The page builder themes (I.e., Elementor, Divi) often use shortcodes, which can add a lot of overhead. In one case, I had to move a site running a page builder theme to a higher-end VPS host to handle the processing overhead and bring page response times down to a reasonable number.
- Try disabling all your plugins to see if your response time improves. Each plugin adds a little performance tax. Usually, no single plugin is too bad, but if you go crazy with the plugins, it can add up!
- Check your site’s response time at different times of the day. If you are on a shared hosting plan, there may be times of the day the server is busier than others.
Bonus: HTML, CSS, and JavaScript optimization
Believe it or not, spaces and new line characters matter, and there is a good chance your HTML, CSS, and JavaScript files are loaded with them. In addition, sometimes your CSS is better served in line with your HTML instead of as separate files.
A plugin named “Autoptimize” can help with this. Install it from your plugins page. There are many options, so do some testing to determine what works best for your site. Here are the options I enabled:
- Optimize JavaScript Code
- Aggregate all linked JS-files to have them loaded non-render blocking
- Optimize CSS Code
- Aggregate all linked CSS-files
- Also aggregate inline CSS
- Inline all CSS
- HTML Options
- Optimize HTML Code
- Also minify inline JS/CSS
- Misc Options
- Save aggregated script/css as static files
- Enable 404 fallbacks
- Also optimize for logged in editors/ administrators
- Enable configuration per post/page
- On the “Extra” tab
- Remove emojis
One last touch for FireflyWP.com: I created a favicon.ico and uploaded it to the WordPress home folder. This will eliminate a 302 redirect that was cluttering my network tab waterfall.
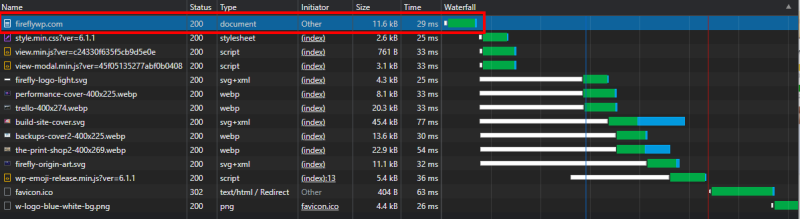
I did a full browser refresh a couple of times to prime the cache and now let’s take a look:

The entire home page for FireflyWP.com is now loading in under 200 ms. I think that’s pretty awesome. I wish I could inline the 3.3 KB of JavaScript, but Autoptimize doesn’t seem to support that option.
One final test using PageSpeed Insights
In part 1, we used PageSpeed Insights to measure our WordPress performance, so it only makes sense to do a final test to see where we stand. I chose the desktop results:
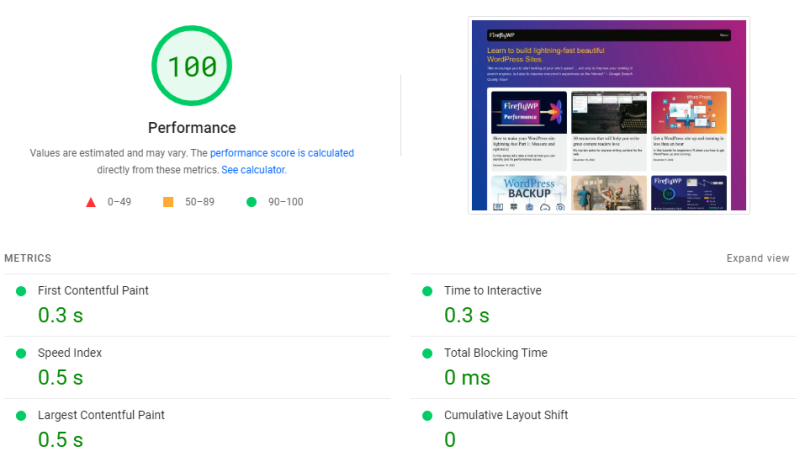
When we started, the Largest Contentful Paint (LCP) metric was 2.4 seconds. Now it is .5 seconds after all our optimizations. That’s nearly a 5x performance improvement! I am interested to learn how you made out with your own site. Post in the comments below.
Leave a Reply